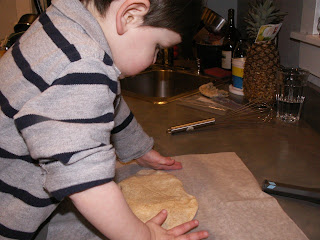
Cousin-chef Ari has been at it again, cooking up a little of this and a little of that in his Chicago kitchen. This time, he’s offered to share his recipe for honey-wheat pizza dough and even threw in a few pictures of his special technique. Take it away, Ari, Elizabeth, and Adam:
Like most other two-year-olds, our Ari Simon can be a rather picky eater. Lately, his faves are: fruit, fruit salad, muffins, and pizza. A few other things rank further down the list. Thankfully, pizza is actually a great canvas for a healthy and varied meal. Even better, pizza is a lot of hands-on fun to make, especially with the little guys and gals. And, making pizza employs one of those crucial skills which is so hard to impart: waiting. Waiting for the dough to rise can take a really long time, like a snack plus a walk around the block PLUS a game of hide and seek. Wow. Don’t forget to check on the dough in between to see if it’s big enough yet.
Ari chose to make his pizza this time with the standard cheese and sauce, which is always delicious. This dough is fairly sturdy, so feel free to add any toppings you like, from meats to vegetables to all kinds of cheeses. A hit for the grownups here is a sauceless pizza” brush the dough with olive oil, top with thinly sliced tomatoes, kosher salt, fresh basil and parmesan. You can even make a dessert pizza (basically a galette) by brushing the dough with melted butter, topping with thinly sliced apples, a few pats of butter and sugar and cinnamon. The possibilities are endless. I’m sure that the Yummies in your life will have some very interesting ideas!
Ari’s Honey-Wheat Pizza Dough
*4 1/2 t. active dry yeast (2 packets)
*1 1/3 warm water (105-115 degrees)
*2 c. all purpose flour
*1 1/2- 1 3/4 c. whole wheat flour
*2 T. olive oil
*1 T. salt
*1 T. honey
Together: Put the water in a large bowl or the bowl of a standing mixer. Sprinkle the yeast on top. Let stand for 5 minutes until most of the yeast is dissolved. Encourage your Yummy to watch it bubble and smell the yeast working.
Add all the other ingredients. Mix by hand or on low speed for about one minute to blend all of the ingredients. Knead for about ten minutes by hand or with the dough hook on low to medium speed until the dough is smooth and elastic. Add additional flour by the tablespoon if necessary. (Note: if you don’t have and stand mixer or 10 minutes of patience, you could also use a food processor. Blend the ingredients by hand, then add to the work bowl fitted with the dough hook.)
Have your Yummy coat a large bowl with a little bit of olive oil. Transfer the dough to the bowl and turn to coat with the olive oil. Cover the bowl with plastic wrap or a damp, sturdy kitchen towel and place in a warm spot (75-80 F) to rise (in the winter, we’ll warm the oven then turn it off.) until at least doubled in volume, 1-1 1/2 hours. Encourage your Yummy to note how big the dough is when you first put it in the bowl (“as big as ___________”)so he or she has a reference point as you check on the dough.
Go do something else fun for a while.
When the dough has risen, preheat your oven to 475 degrees F. If you have a baking stone, put it in the oven first.
EXTRA FUN PART: Have your Yummy punch down the dough.
Divide the dough for the size pizzas you want to make. Roll into balls and let rest for 10-15 minutes while you set out your toppings.
Roll and stretch out the dough on a piece of parchment paper, or dust the counter lightly with cornmeal. Don’t worry about holes; you can easily patch them by pinching off a piece of dough from the edge. Top your pizza as you see fit.
Big Person: Sprinkle a little cornmeal onto your baking stone or place your parchment paper directly onto the baking sheet. Transfer the pizza to the hot oven. Bake for about 12 minutes or until it is done to your liking. Enjoy!


